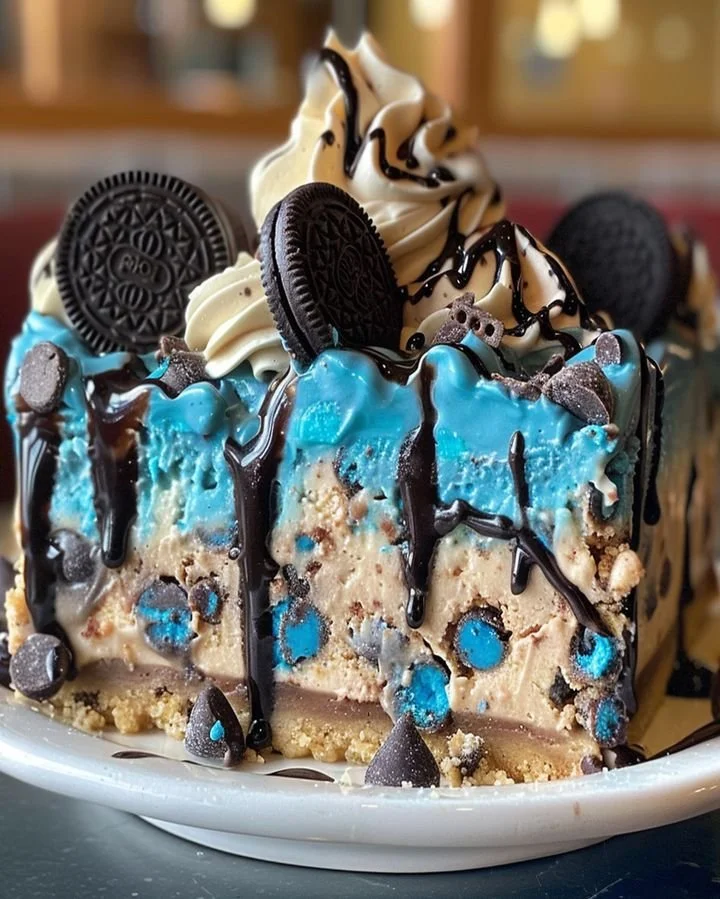
Cookie Monster Cheesecake: A Sweet Delight for Busy Lives
If you’re anything like me, the thought of indulging in a slice of rich, creamy cheesecake can instantly brighten your day. Now, imagine that cheesecake bursting with sweet cookies and whimsical blue hues just like the beloved Cookie Monster from “Sesame Street.” Sounds dreamy, right? Welcome to the world of Cookie Monster Cheesecake, where dessert dreams come true!
This delightful recipe is perfect for those of us juggling hectic schedules or simply looking to treat ourselves and our loved ones to something uniquely delicious. Whether you’re a culinary whiz or someone who occasionally burns toast (no judgment here!), this recipe will guide you through every step with a sprinkle of joy and a dash of humor. Let’s dive in!
Why You’ll Love This Cookie Monster Cheesecake
Apart from its playful blue color and cookie-loaded goodness, this cheesecake is a brilliant way to impress your friends and family without spending hours in the kitchen. Featuring a creamy filling, a crunchy cookie crust, and adorned with charming Cookie Monster features, it’s simply irresistible! Plus, who doesn’t love a dessert that brings out the child in us all?
Ingredients for Cookie Monster Cheesecake
Before we get our hands dirty, let’s check out what you’ll need to create this masterpiece:
For the Cookie Crust:
- 2 cups crushed chocolate cookies (Oreos work wonders!)
- ½ cup unsalted butter, melted
For the Cheesecake Filling:
- 24 oz cream cheese, softened
- 1 cup granulated sugar
- 1 tsp pure vanilla extract
- 3 large eggs
- 1 cup sour cream
- Blue food coloring (because it’s the Cookie Monster, duh!)
- 1 cup mini chocolate chips
- 1 cup crushed cookies for topping (more isn’t always better, but it can be here!)
Directions: Your Step-by-Step Guide
-
Prepare the Crust:
- Start by preheating your oven to 325°F (about 160°C). Time to unleash the cookie magic!
- In a bowl, combine the crushed chocolate cookies and melted butter, mixing until it resembles damp sand.
- Press this mixture firmly into the bottom of a 9-inch springform pan. Bake for about 10 minutes, then let it cool.
-
Make the Filling:
- In a large mixing bowl, beat the softened cream cheese and granulated sugar until smooth and fluffy—about 2-3 minutes. Pretend you’re a fancy pastry chef!
- Add the vanilla extract, then one by one, mix in the eggs, making sure everything’s incorporated nicely.
- Stir in the sour cream and a few drops of blue food coloring until you achieve the desired blue hue. Be careful—you don’t want your kitchen looking like Cookie Monster exploded!
-
Add the Festive Touch:
- Gently fold in the mini chocolate chips and crushed cookies, infusing those playful surprises throughout the cheesecake.
- Pour this luscious filling over your cooled crust, smoothing the top with a spatula.
-
Bake the Cheesecake:
- Place the springform pan onto a baking sheet (in case of any spills). Bake in the preheated oven for about 50-60 minutes until the edges are set but the center is still slightly jiggly.
- Turn off the oven and let the cheesecake cool inside for another hour with the door slightly ajar—this helps prevent cracks!
-
Chill the Cheesecake:
- Once cool, cover it, and refrigerate for at least 4 hours (or overnight, if you can resist the temptation). It’ll develop a creaminess that’s downright addictive.
-
Finishing Touches:
- Before serving, remove the cheesecake from the springform pan and top with crushed cookies and extra chocolate chips. You can even add some edible eyes to create a true Cookie Monster masterpiece—because we all need a little whimsy in our lives!
Cooking Tips for Cookie Monster Cheesecake
- Don’t worry if your cheesecake has a little jiggle in the center when you take it out—that’s perfectly normal! It will firm up as it chills in the fridge.
- If you want a vibrant blue shade, remember, a little food coloring goes a long way. Start with a few drops and build up until you reach your preferred hue.
- For an extra decadent touch, serve with whipped cream or a drizzle of chocolate sauce on top!
Personal Anecdote: Baking Memories
Making this Cookie Monster Cheesecake with my sister Patricia became an annual tradition during our family gatherings. The look on our kids’ faces when they first laid eyes on the blue wonder is priceless! They cherish it as a “fun treat,” and honestly, it’s such a joy to blend nostalgia and creativity in my kitchen.
FAQs About Cookie Monster Cheesecake
Can I substitute cream cheese for another cheese?
While cream cheese is key for that iconic texture, you could experiment with mascarpone for a sweeter version, but it’ll change the overall flavor.
How should I store leftovers?
Refrigerate any leftovers in an airtight container. You’ll want to keep that cheesecake fresh and delicious for as long as possible (if it lasts, that is!).
Can I use low-fat cream cheese?
Absolutely! It might not be as rich, but it will still hold its shape and flavor very well.
Let’s wrap this up, shall we?
So there you have it, Cookie Monster Cheesecake, a delightful dessert that’ll win over both kids and grown-ups alike. Life might get busy, but taking the time to create something sweet and whimsical like this will remind you that joy can be baked right in your own kitchen. Gather your family, whip up this recipe, and watch smiles unfold. Happy baking!
If you’re craving more delightful desserts or looking for easy weeknight meals, check out some of our other recipes like No-Bake Chocolate Tart or Banana Bread with a Twist. Don’t forget to click around our site for more culinary inspirations that blend comfort and innovation in every bite!
Meta Description
"Cookie Monster Cheesecake is the perfect recipe for dessert lovers. Quick, easy, and utterly delicious, it’s bound to impress everyone! Try it today!"
Cookie Monster Cheesecake
Ingredients
Method
- Preheat your oven to 325°F (about 160°C).
- In a bowl, combine the crushed chocolate cookies and melted butter until it resembles damp sand.
- Press this mixture firmly into the bottom of a 9-inch springform pan.
- Bake for about 10 minutes, then let it cool.
- In a large mixing bowl, beat the softened cream cheese and granulated sugar until smooth and fluffy—about 2-3 minutes.
- Add the vanilla extract, then mix in the eggs one by one until fully incorporated.
- Stir in the sour cream and a few drops of blue food coloring until you achieve the desired blue hue.
- Gently fold in the mini chocolate chips and crushed cookies.
- Pour the filling over your cooled crust, smoothing the top with a spatula.
- Place the springform pan onto a baking sheet and bake for about 50-60 minutes until the edges are set but the center is slightly jiggly.
- Turn off the oven and let the cheesecake cool inside for another hour with the door slightly ajar to prevent cracks.
- Once cool, cover it and refrigerate for at least 4 hours (or overnight).
- Remove the cheesecake from the springform pan and top with crushed cookies and extra chocolate chips. Optionally add edible eyes for a fun touch.