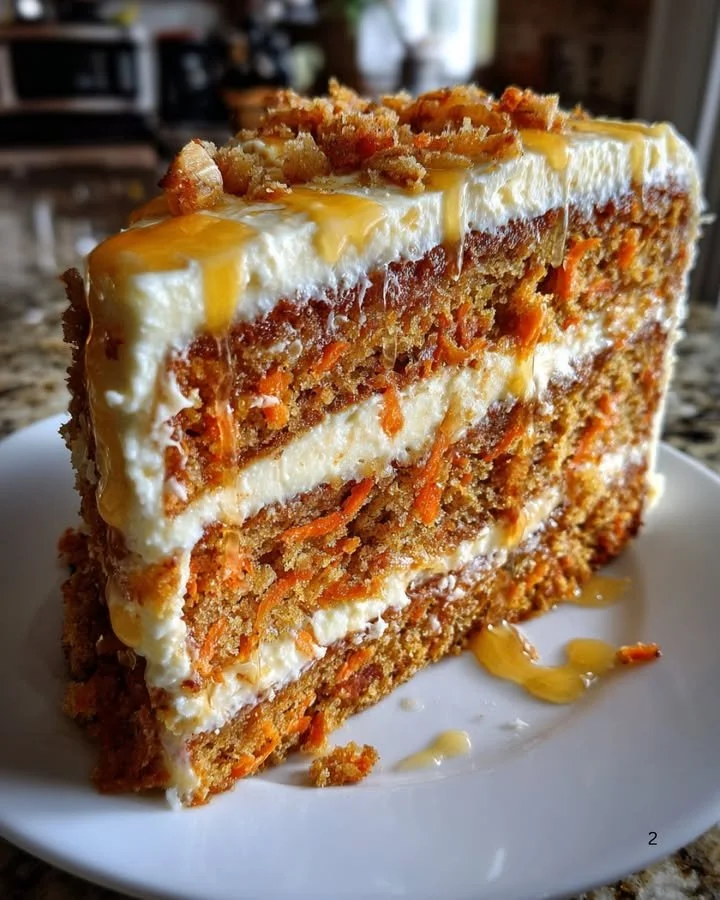
Honeybun Carrot Cake: Your Sweet Solution for Any Occasion
Let’s be honest: life can sometimes throw a bit too much at us. Between work commitments and family routines, who has hours to spend in the kitchen? If you’re nodding your head in agreement, then you’re in for a treat! The Honeybun Carrot Cake is here to save the day. It’s the perfect mix of sweetness, warmth, and nostalgia that will light up your table and your heart—no matter how chaotic your week has been.
Why You’ll Love This Honeybun Carrot Cake
This delightful Honeybun Carrot Cake is not just another dessert; it’s essentially a hug on a plate. It combines the comforting flavors of carrot cake with a luscious honey glaze that will make your taste buds dance with joy. Plus, it’s incredibly easy to whip up, packing all the heartiness of homemade goodness without making you sweat over the stove.
So, grab your favorite apron, and let’s embark on this delicious adventure together!
Ingredients
Let’s make sure you have everything ready to create this dreamy Honeybun Carrot Cake:
For the Cake:
- 2 cups all-purpose flour
- 2 cups granulated sugar
- 1 teaspoon baking powder
- 1 teaspoon baking soda
- 1 teaspoon ground cinnamon
- 1 teaspoon salt
- 4 large eggs
- 1 cup vegetable oil
- 2 cups grated carrots (about 4-5 carrots)
- 1 cup crushed pineapple, drained
- 1 cup chopped walnuts (optional)
- 1 teaspoon vanilla extract
For the Honey Glaze:
- ½ cup unsalted butter
- 1 cup powdered sugar
- ¼ cup honey
- ¼ teaspoon vanilla extract
- A pinch of salt
Directions: Easy Steps to Honeybun Bliss
-
Preheat the Oven
Preheat your oven to 350°F (175°C). Don’t skip this step, or your cake might decide to take a little vacation instead of rising nicely! -
Mix Dry Ingredients
In a large mixing bowl, whisk together the flour, sugar, baking powder, baking soda, cinnamon, and salt. This mix will create the base of your cake. Just think about how good your kitchen is going to smell! -
Add Wet Ingredients
Beat the eggs in a separate bowl and then add them along with the vegetable oil, grated carrots, crushed pineapple, walnuts, and vanilla to your dry mixture. Stir until just combined—no need to overdo it! -
Pour Into Pan
Grease two 9-inch round cake pans (or one 9×13 if you prefer). Divide your cake batter evenly between the pans. -
Bake to Perfection
Bake for 25-30 minutes, or until a toothpick inserted in the center comes out clean. While it bakes, use this time to clean up (or sneak a cookie; we won’t judge!). -
Get Your Glaze Ready
While your cake is cooling, melt the butter in a small saucepan. Then, whisk in the powdered sugar, honey, vanilla, and salt. Let it simmer for about 2-3 minutes until smooth and delicious. -
Assemble the Cake
If you’ve baked in two pans, let them cool for about 10 minutes before removing them from the pans. Then, place one layer on a serving plate, drizzle half of your honey glaze on top, and then place the second layer on top. Drizzle the remaining glaze on top and let it cascade down the sides. -
Serve and Enjoy
Cut a slice, take a moment to admire your handiwork, and dig in! Your Honeybun Carrot Cake is best enjoyed warm with a side of laughter and loved ones.
Cooking Tips: Sweetening the Deal
- Grate Your Own Carrots: Trust me, pre-packaged grated carrots aren’t the same. Take a few minutes to grate them yourself. It’s therapeutic!
- Make it Moist: If your cake seems a tad dry, add a few extra tablespoons of crushed pineapple. It will make your cake heavenly!
- Glaze Extra Please: If you like it sweeter—who doesn’t?—double the glaze recipe. Don’t worry, your cake will thank you!
Personal Anecdote
Every time I bake this Honeybun Carrot Cake, I’m reminded of the time my sister Patricia and I hosted an impromptu family gathering. We had more left-over carrots than we knew what to do with, and in a well-intentioned panic, we created this recipe together. The laughter, the mess, and finally the satisfied smiles around the table? Those moments are priceless—the kind that reminds you that cooking is all about the joy it brings to our lives.
FAQs
Can I substitute the sugar in this recipe?
Sure! You can use brown sugar for a deeper flavor. Just keep in mind it may alter the overall texture a bit.
How can I store leftovers?
This cake can be kept covered at room temperature for about 2 days. If you want it to last longer, refrigerate it for up to a week. But honestly, leftovers may be scarce!
Can I freeze the cake?
Absolutely! Just wrap it well and freeze. It can last up to three months in the freezer. Don’t forget to label it so you don’t mysteriously unearth it during spring cleaning!
As you embrace the wonderfulness that is Honeybun Carrot Cake, remember that it’s not just about the incredible flavors on your plate, but also about the memories you’re creating with every bite. So bake up some joy today because this cake is bound to make anyone smile. Give it a try, and let’s cook up happiness together!
Meta Description:
Honeybun Carrot Cake is the perfect recipe for busy days. Quick, easy, and delicious, this cake will become your go-to dessert. Try it today!
Feel free to explore more delightful recipes like our Chocolate Chip Banana Muffins or Classic Macaroni and Cheese for more fun in the kitchen!

Honeybun Carrot Cake
Ingredients
Method
- Preheat your oven to 350°F (175°C).
- In a large mixing bowl, whisk together the flour, sugar, baking powder, baking soda, cinnamon, and salt.
- In a separate bowl, beat the eggs and then add the vegetable oil, grated carrots, crushed pineapple, walnuts, and vanilla to the dry mixture. Stir until just combined.
- Grease two 9-inch round cake pans (or one 9×13 if preferred) and divide the batter evenly between the pans.
- Bake for 25-30 minutes, or until a toothpick inserted in the center comes out clean.
- Let the cakes cool for about 10 minutes before removing them from the pans.
- While the cakes are cooling, melt the butter in a small saucepan, then whisk in the powdered sugar, honey, vanilla, and salt. Let it simmer for 2-3 minutes until smooth.
- Place one layer of the cake on a serving plate, drizzle half of the honey glaze on top, then place the second layer on top and drizzle the remaining glaze over it.
- Cut a slice, take a moment to admire your handiwork, and dig in!