Title: Delightful Cherry Bars for a Crowd: A Sweet Solution for Busy Days
Introduction
If you’re looking for a quick and delightful dessert that will have everyone singing your praises, look no further than Cherry Bars for a Crowd! Whether you’re gearing up for a family gathering, a potluck, or just need a sweet treat to brighten your day, these cherry bars are the perfect solution. They’re easy to whip up, beautifully vibrant, and oh-so-delicious – not to mention they’ll make your kitchen smell like springtime bliss on a sunny afternoon!
Join me, Anna, on this culinary adventure as we dive into this delightful recipe that blends love, flavor, and a touch of fun. I can’t wait to see how you put your spin on these cherry bars!
Why You’ll Love These Cherry Bars for a Crowd
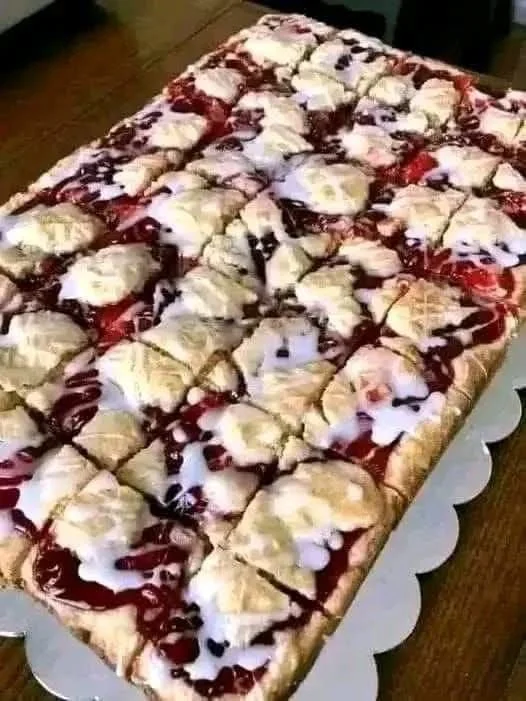
Cherry Bars for a Crowd are not just about the juicy, sweet-tart cherries; they are also a fantastic canvas for every tastebud in your family and friends. With a buttery crust and a fruity, zingy filling, these bars are a treat everyone can enjoy. Plus, you can cut them into easy-to-handle squares, making them the ultimate grab-and-go dessert. Perfect for those of us who are always on the move!
Ingredients
Here’s what you’ll need to create your cherry deliciousness:
- 2 cups all-purpose flour
- 1 cup granulated sugar
- 1/2 cup unsalted butter, softened
- 1/2 cup powdered sugar (because who doesn’t love a little sweetness?)
- 2 large eggs
- 1 teaspoon vanilla extract
- 1/2 teaspoon almond extract (trust me, it adds a secret layer of flavor!)
- 1/2 teaspoon salt
- 1 can (21 ounces) cherry pie filling
- 1 tablespoon lemon juice (a little zing never hurt anyone!)
Steps to Make Cherry Bars for a Crowd
-
Preheat Your Oven: Start by preheating your oven to 350°F (175°C). Trust me; this is a crucial step—nobody wants soggy bars!
-
Mix the Crust: In a large mixing bowl, cream together the softened butter, granulated sugar, and powdered sugar until smooth. Add the eggs, one at a time, mixing well after each addition. Stir in the vanilla and almond extracts.
-
Add Dry Ingredients: Gradually add the flour, salt, and lemon juice, mixing until just combined. The dough might be a tad sticky, but that’s okay—it’s all part of the fun!
-
Press into the Pan: Grease a 9×13 inch baking pan, and spread three-quarters of the dough evenly on the bottom, pressing it down to form a solid base.
-
Add Cherry Filling: Spoon the cherry pie filling over the pressed dough, spreading it out evenly like a beautifully painted canvas.
-
Top It Off: Crumble the remaining dough over the cherry filling. Don’t stress if it’s not perfect; we’re embracing that rustic charm!
-
Bake: Pop that beauty into the oven for 30-35 minutes, or until the top is golden-brown and the cherry filling is bubbly. Your kitchen is about to smell heavenly!
-
Chill and Cut: Once baked, allow your cherry bars to cool in the pan for about 10-15 minutes before transferring them to a wire rack. After they’re completely cool, cut them into squares (or rectangles, if you’re feeling rebellious).
Cooking Tips
- Make Ahead: These bars can be made a day in advance and stored in the refrigerator. The flavors blend beautifully overnight!
- Add a Twist: Feeling adventurous? Swap out the cherry filling for blueberry or peach—your taste buds will thank you!
- Serving Suggestion: Serve them with a dollop of whipped cream or a scoop of vanilla ice cream for extra decadence. You know you want to!
Personal Anecdote
I remember the first time I made these Cherry Bars for a crowd—it was for my sister Patricia’s book club. They were such a hit that I barely had time to snag a piece before they were devoured. It felt like I was giving out free samples at a fair! Now, it’s my go-to for any gathering. If your guests don’t instantly forget about their diets while indulging in these, I’d say you’ve concocted a miracle!
FAQs
Can I substitute the cherry pie filling?
Absolutely! Feel free to explore your favorite fruit fillings. Blueberries, peaches, or even homemade jam work wonders!
How can I store leftovers?
These cherry bars keep well in an airtight container in the fridge for about a week—if they last that long!
Final Thoughts
These Cherry Bars for a Crowd are not just a dessert but an experience filled with laughter and joy. You’ll not only impress friends and family but also enjoy a delicious treat that’s simple to make. So, grab your apron, and let’s create something yummy together!
For more tasty treats like this, check out my other sweet recipes on this site—there’s always room for more joy in our kitchens!
Meta Description: Cherry Bars for a Crowd is the perfect recipe for busy days. Quick, easy, and delicious, these sweet treats will steal the show!
Cherry Bars for a Crowd
Ingredients
Method
- Preheat your oven to 350°F (175°C).
- In a large mixing bowl, cream together the softened butter, granulated sugar, and powdered sugar until smooth.
- Add the eggs, one at a time, mixing well after each addition. Stir in the vanilla and almond extracts.
- Gradually add the flour, salt, and lemon juice, mixing until just combined.
- Grease a 9x13 inch baking pan, and spread three-quarters of the dough evenly on the bottom, pressing it down.
- Spoon the cherry pie filling over the pressed dough, spreading it out evenly.
- Crumble the remaining dough over the cherry filling.
- Bake for 30-35 minutes, or until the top is golden-brown and the cherry filling is bubbly.
- Allow to cool in the pan for about 10-15 minutes before transferring to a wire rack.
- Cut into squares once completely cool.