Decadent Red Velvet Cheesecake: A Show-Stopping Treat for Busy Moms and Dessert Lovers
Meta description: Red Velvet Cheesecake is the perfect dessert for busy home bakers. Rich, silky, and surprisingly simple — a show-stopper that’s worth the love.
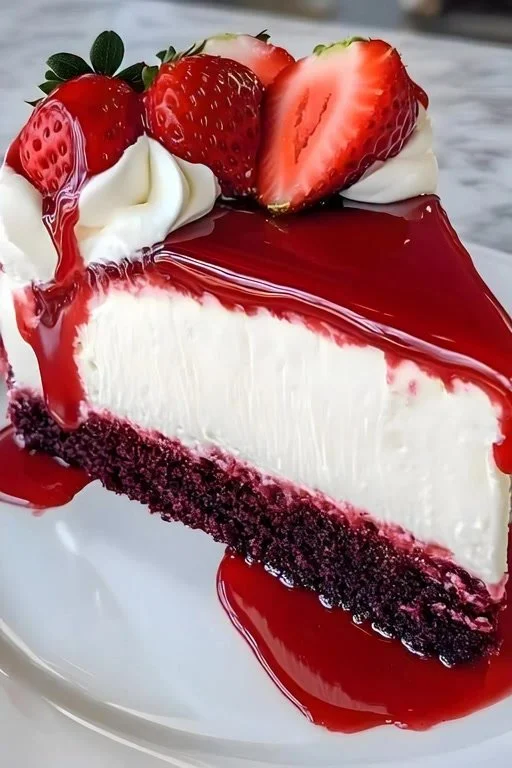
There are two kinds of days in my kitchen: the "throw-together" weeknight nights and the ones where I want to waltz into the dining room holding something that makes people gasp. Enter this Red Velvet Cheesecake — silky cream cheese filling, a whisper of cocoa, and that dramatic red hue that says “special occasion” even if it’s Tuesday. If you’ve been craving a dessert that impresses guests but won’t eat up your whole weekend, this is it.
If you love the layered approach, I sometimes adapt this into a bundt-cake mashup I found inspiration from — check out this layered red velvet cheesecake bundt cake for a playful twist: layered red velvet cheesecake bundt cake.
Why You’ll Love This Red Velvet Cheesecake
- It looks fancy but is surprisingly approachable: busy moms and professionals will appreciate that most active work is simple mixing and a little patience while it bakes.
- The texture is velvety (yes, that’s the point) and the flavor balances tangy cream cheese with a hint of cocoa and vanilla.
- Make it ahead: bake one day, chill overnight, and you’ll be the hero at brunch, birthdays, or family dinners.
Ingredients
Makes one 9-inch springform cheesecake (8–10 servings)
For the crust
- 1 3/4 cups graham cracker crumbs (about 12 full sheets) or use chocolate wafer crumbs for a darker crust
- 1/4 cup unsweetened cocoa powder (optional — I like the subtle chocolate note)
- 6 tablespoons unsalted butter, melted
- 2 tablespoons granulated sugar
For the cheesecake filling
- 32 oz (900 g) cream cheese, room temperature (four 8-oz packages)
- 1 1/4 cups granulated sugar
- 3 large eggs, room temperature
- 1/2 cup sour cream, room temperature
- 1/2 cup heavy cream, room temperature
- 2 tablespoons unsweetened cocoa powder
- 2 teaspoons vanilla extract
- 1 teaspoon white vinegar or 1 tablespoon lemon juice (helps with the classic tang)
- 2–3 teaspoons gel red food coloring (adjust to your preferred shade)
- Pinch of fine salt
For the cream cheese topping (optional)
- 8 oz cream cheese, room temperature
- 1 cup powdered sugar, sifted
- 1/2 teaspoon vanilla extract
- 1/2 cup heavy cream, whipped to soft peaks
Garnish (optional)
- Whipped cream rosettes, cake crumbs, or fresh berries
Equipment tip: a 9-inch springform pan, a roasting pan for a water bath, and a blender or hand mixer.
Step-by-step Directions
Prep: Preheat oven to 325°F (160°C). Wrap the outside of a 9-inch springform pan twice with heavy-duty aluminum foil (this keeps water out during the water bath). Grease the bottom and sides lightly.
-
Make the crust
- In a medium bowl, mix graham cracker crumbs, cocoa (if using), melted butter, and sugar until the mixture resembles wet sand.
- Press the crumbs evenly into the bottom (and about 1/2 inch up the sides, if you like) of the prepared springform pan using the bottom of a measuring cup for a firm base. Chill in the fridge while you make the filling.
-
Make the filling
- Beat the room-temperature cream cheese in a large bowl on medium speed until smooth and lump-free (about 2–3 minutes). Scrape the bowl.
- Add sugar and beat until combined.
- Add eggs one at a time, mixing on low speed and scraping between additions. Don’t overbeat — you want a silky texture without too much air.
- Mix in sour cream, heavy cream, cocoa powder, vanilla, vinegar (or lemon), and a pinch of salt until smooth.
- Add gel red food coloring and fold it in gently until the color is even. Gel coloring gives richer color without watering down the batter.
-
Bake in a water bath
- Pour the filling over the chilled crust and smooth the top with a spatula.
- Place the wrapped springform pan into a large roasting pan. Carefully pour hot (not boiling) water into the roasting pan until it comes halfway up the sides of the springform pan.
- Bake at 325°F for 55–70 minutes, or until the edges are set and the center still has a slight wobble (it will continue to set as it cools).
-
Cool and chill
- Turn off the oven and crack the door open. Let the cheesecake sit inside for 1 hour (this gentle cooling helps prevent cracks).
- Remove from the oven, lift out of the water bath, unwrap foil, and let cool to room temperature on a wire rack.
- Refrigerate for at least 6 hours, preferably overnight.
-
Optional topping
- Beat the cream cheese until smooth, then add powdered sugar and vanilla. Fold in whipped heavy cream until airy. Spread or pipe over the chilled cheesecake and garnish with crumbs or berries.
Serving note: Run a thin knife along the pan edge before releasing the springform to keep slices clean. Serve chilled. This cake slices beautifully with a hot, dry knife — dip it in hot water and wipe between cuts.
Cooking Tips (From My Kitchen to Yours)
- Room temperature ingredients matter: cold cream cheese or eggs lead to lumps and overmixing — which brings air and cracks. Let them sit out 30–45 minutes.
- Don’t overmix: mix just until combined; extra air means more chance of cracks.
- Gel food coloring beats liquid for deep red color without thinning the batter. I usually use 2–3 teaspoons; add a little at a time until you like the shade.
- The water bath is your friend: it moderates oven heat and keeps the top smooth. Wrap the pan well!
- If a tiny crack appears, cover it with whipped topping or a dusting of cocoa — nobody will notice after the first bite.
- Make ahead: cheesecake gets better after a night in the fridge. Bake one day, decorate the next.
A Little Story (Because Food Is Memory)
My sister Patricia and I have a little tradition: the Thursday “test bake.” It started as a way to try new recipes before sharing them with family. This Red Velvet Cheesecake first made my weekly rotation when my niece requested “that red one that tastes like a velvet hug.” Now it’s my go-to dessert for when I want something that looks extravagant but doesn’t require a culinary degree. We even brought one to a neighborhood potluck once; a neighbor asked if I’d opened a bakery. I smiled, took the compliment, and handed them the recipe — because good food is better when shared.
Ingredient Swaps & Variations
- Crust: Swap graham crackers for Oreo crumbs (filling without the cream) for a chocolate bed, or use ginger snaps for a spiced twist.
- Gluten-free: Use gluten-free graham crumbs or cookie crumbs in a 1:1 swap.
- Dairy-free: Use full-fat vegan cream cheese and coconut cream — texture will vary, but it’s doable.
- Flavor: Add 1 tablespoon espresso for depth; skip the cocoa for a milder red velvet.
- Mini cheesecakes: Divide into muffin tins lined with liners and bake for 18–22 minutes.
FAQs
Q: Can I substitute buttermilk for sour cream?
A: Yes — use 1/2 cup buttermilk in place of sour cream for a tangier profile. It will thin the batter slightly, so mix gently and watch baking time.
Q: How do I store leftovers?
A: Keep cheesecake covered in the fridge for up to 5 days. For longer storage, wrap tightly and freeze up to 2 months; thaw in the fridge overnight.
Q: Can I skip the water bath?
A: You can, but the cheesecake is more prone to cracks. If you skip it, bake at 300°F and set a pan of hot water on a lower rack to add steam.
Q: Can I make this without red food coloring?
A: Red velvet has a visual element, but the flavor is mostly cream cheese and a touch of cocoa. You can skip the color for a “velvet cheesecake” that’s still delicious.
Q: Is this similar to a red velvet cake?
A: The flavors overlap — cocoa, tang, and red color — but texture and richness differ. If you want a layered dessert that combines both, check out this other red velvet cheesecake variation: Red Velvet Cheesecake inspiration.
Serving Ideas
- Slice and serve with a dollop of lightly sweetened whipped cream and fresh raspberries.
- Add a salted caramel drizzle for grown-up contrast.
- For holiday wow-factor, pipe rosettes and scatter edible gold glitter (because sometimes we deserve sparkle).
Troubleshooting Quick Guide
- Lumpy batter: beat cream cheese until fully smooth before adding sugar and eggs.
- Soggy crust: don’t overfill the crust with butter; bake crust 5–8 minutes ahead for a firmer base if desired.
- Over-browned top: tent with foil in the last 10–15 minutes of baking.
Want more cheesecake ideas and desserts that double as conversation starters? I share plenty of sweet and savory inspiration on the blog — from weeknight wins to party pieces. If you’re in the mood for a different red velvet spin, you might enjoy exploring my other red velvet cheesecake ideas and tips on perfecting textures and toppings.
Conclusion
If you’re ready to bake something that feels fancy yet fits into a busy week, this Red Velvet Cheesecake is your new best friend. For another take on the classic — and a wealth of step-by-step photos and variations — check out Life Love & Sugar’s version in "The Ultimate Red Velvet Cheesecake" (The Ultimate Red Velvet Cheesecake | Life Love & Sugar). For inspiration on decorating and layered presentations that wow a crowd, see "Red Velvet Cheesecake Cake" over at Recipe Girl (Red Velvet Cheesecake Cake – Recipe Girl). Happy baking — and when someone says “how did you do that?” just smile and blame Patricia.
Red Velvet Cheesecake
Ingredients
Method
- Preheat oven to 325°F (160°C). Wrap the outside of a 9-inch springform pan twice with heavy-duty aluminum foil to keep water out during the water bath. Grease the bottom and sides lightly.
- In a medium bowl, mix graham cracker crumbs, cocoa (if using), melted butter, and sugar until the mixture resembles wet sand.
- Press the crumbs evenly into the bottom (and about 1/2 inch up the sides, if you like) of the prepared springform pan using the bottom of a measuring cup for a firm base. Chill in the fridge while you make the filling.
- Beat the room-temperature cream cheese in a large bowl on medium speed until smooth and lump-free (about 2–3 minutes). Scrape the bowl.
- Add sugar and beat until combined.
- Add eggs one at a time, mixing on low speed and scraping between additions. Don’t overbeat — aim for a silky texture without too much air.
- Mix in sour cream, heavy cream, cocoa powder, vanilla, vinegar (or lemon), and a pinch of salt until smooth.
- Add gel red food coloring and fold it in gently until the color is even.
- Pour the filling over the chilled crust and smooth the top with a spatula.
- Place the wrapped springform pan into a large roasting pan. Carefully pour hot (not boiling) water into the roasting pan until it comes halfway up the sides of the springform pan.
- Bake at 325°F for 55–70 minutes, or until the edges are set and the center still has a slight wobble.
- Turn off the oven and crack the door open. Let the cheesecake sit inside for 1 hour.
- Remove from the oven, lift out of the water bath, unwrap foil, and let cool to room temperature on a wire rack.
- Refrigerate for at least 6 hours, preferably overnight.
- Beat the cream cheese until smooth, add powdered sugar and vanilla, then fold in whipped heavy cream until airy. Spread or pipe over the chilled cheesecake and garnish with crumbs or berries.