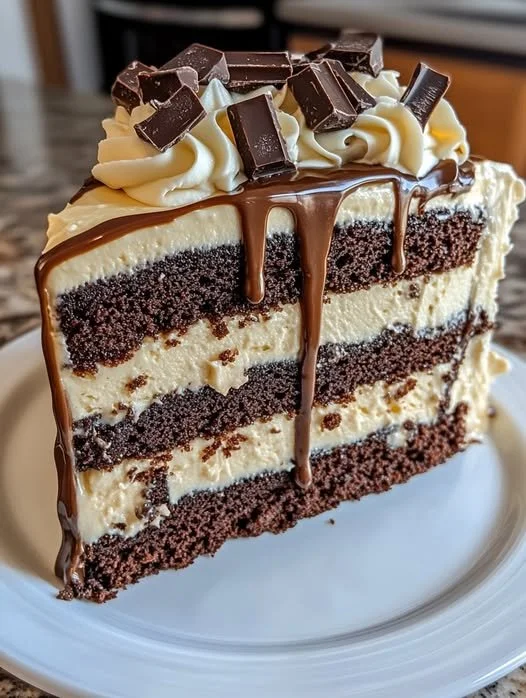
A Slice of Heaven: Blue Ribbon Chocolate Dream Cake
If you’re anything like me, chocolate is not just a food item—it’s a way of life! And let me tell you, when it comes to cake, nothing can beat the rich, decadent goodness of a Blue Ribbon Chocolate Dream Cake. This recipe is perfect for busy American moms and professionals who want to whip up something that not only tastes amazing but also impresses their family and friends. So, grab that apron, and let’s dive into chocolatey bliss!
Why You’ll Love This Blue Ribbon Chocolate Dream Cake
Let’s face it: life can be hectic. Between juggling work, family, and the occasional awkward Zoom call, we all need a quick and easy way to bring a bit of joy into our day. This Blue Ribbon Chocolate Dream Cake fits the bill perfectly. It’s indulgently rich, gloriously fluffy, and comes together faster than you can say, “I need chocolate!” Plus, it’s a fantastic centerpiece for any gathering, whether it’s a birthday, anniversary, or just a little Tuesday pick-me-up.
Ingredients
For this delightful cake, you’ll need:
For the Cake
- 1 ¾ cups all-purpose flour
- 1 ¾ cups granulated sugar
- ¾ cup unsweetened cocoa powder
- 1 ½ teaspoons baking powder
- 1 ½ teaspoons baking soda
- 1 teaspoon salt
- 2 large eggs
- 1 cup whole milk
- ½ cup vegetable oil
- 2 teaspoons pure vanilla extract
- 1 cup boiling water
For the Frosting
- 1 cup unsalted butter, softened
- 3 ½ cups powdered sugar
- ½ cup unsweetened cocoa powder
- 1 teaspoon vanilla extract
- ¼ cup milk (adjust for consistency)
Optional Garnish
- Chocolate shavings or sprinkles (because let’s be honest, more chocolate is always a good idea!)
Steps to Make Your Blue Ribbon Chocolate Dream Cake
-
Preheat the Oven: Preheat your oven to 350° F (175° C). Don’t skip this step! A hot oven is essential for baking magic to happen.
-
Mix Dry Ingredients: In a large mixing bowl, combine the flour, sugar, cocoa powder, baking powder, baking soda, and salt. Whisk these together like you’re trying to keep the kids entertained. Make it fun!
-
Combine Wet Ingredients: In another bowl, combine the eggs, milk, vegetable oil, and vanilla extract. Mix them well—go ahead and channel your inner chef!
-
Bring It All Together: Gradually add the wet mixture to the dry ingredients. Mix until just combined; it’s okay if there are a few lumps. Remember, we’re not making a soufflé here!
-
Add the Boiling Water: Carefully stir in the boiling water. The batter will look a little runny, but that’s the secret to keeping your cake moist and magical.
-
Bake: Pour the batter into two greased 9-inch round cake pans. Bake for 30-35 minutes or until a toothpick inserted in the center comes out clean. That’s your golden ticket!
-
Cool: Let the cakes cool in their pans for about 10 minutes, then transfer them to a wire rack to cool completely. Try not to eat the edges while they’re still warm; I know, it’s tough!
-
Frost Away: While the cakes cool, make the frosting. Beat the softened butter until creamy, then gradually add the powdered sugar and cocoa powder. Mix in the vanilla and enough milk to reach a spreadable consistency.
-
Assemble the Cake: Place one cake layer on a serving plate. Spread a generous helping of frosting on top, then place the second layer on top and cover the whole cake in frosting. Feel free to get creative with decorations!
-
Enjoy: Slice it up and serve with a smile! You’ve earned it.
Cooking Tips
- Picky Eaters? If you’re serving this to kids or chocolate skeptics, just tell them it’s called “Dream Cake” and watch them flock to it like moths to a flame.
- Leftover Cake Storage: Good luck with leftovers! But if you end up with some (fingers crossed), store it in an airtight container at room temperature for up to 4 days or in the fridge for up to a week.
- Frosting Fun: Can’t get enough frosting? Double the recipe! Because who doesn’t want a cake that’s dripping with frosting?
FAQs
Can I substitute the cocoa powder?
Absolutely! You can use Dutch-processed cocoa for a deeper flavor, or even carob powder if you’re feeling adventurous.
How can I make this cake ahead of time?
You can bake the cakes a day in advance and frost them on the big day. Just be sure to store them in an airtight container.
Can I freeze the cake?
Definitely! Just wrap the cooled cakes tightly in plastic wrap and store them in a freezer-safe container. They’ll keep for about three months, ready for a chocolate craving!
This Blue Ribbon Chocolate Dream Cake might just become your secret weapon for celebrations, family gatherings, or even just a sweet reward after a long week. Life is too short for boring desserts—so indulge, enjoy, and let the chocolate make your day just a little brighter!
If you’re itching for more delightful recipes, be sure to check out my Chocolate Chip Cookie Bars or Decadent Chocolate Mousse — because chocolate, let’s face it, is always a good idea!
Meta Description: Blue Ribbon Chocolate Dream Cake is the perfect recipe for chocolate lovers. Quick, easy, and delicious, this dish will become your go-to dessert. Try it today!
Blue Ribbon Chocolate Dream Cake
Ingredients
Method
- Preheat your oven to 350° F (175° C).
- In a large mixing bowl, combine the flour, sugar, cocoa powder, baking powder, baking soda, and salt.
- In another bowl, combine the eggs, milk, vegetable oil, and vanilla extract.
- Gradually add the wet mixture to the dry ingredients and mix until just combined.
- Carefully stir in the boiling water.
- Pour the batter into two greased 9-inch round cake pans.
- Bake for 30-35 minutes or until a toothpick inserted in the center comes out clean.
- Let the cakes cool in their pans for about 10 minutes, then transfer them to a wire rack to cool completely.
- While the cakes cool, beat the softened butter until creamy.
- Gradually add the powdered sugar and cocoa powder, mixing well.
- Mix in the vanilla and adjust milk for desired consistency.
- Place one cake layer on a serving plate, spread frosting on top, and then add the second layer and cover the whole cake in frosting.
- Get creative with decorations if you like!
- Slice it up and serve with a smile!