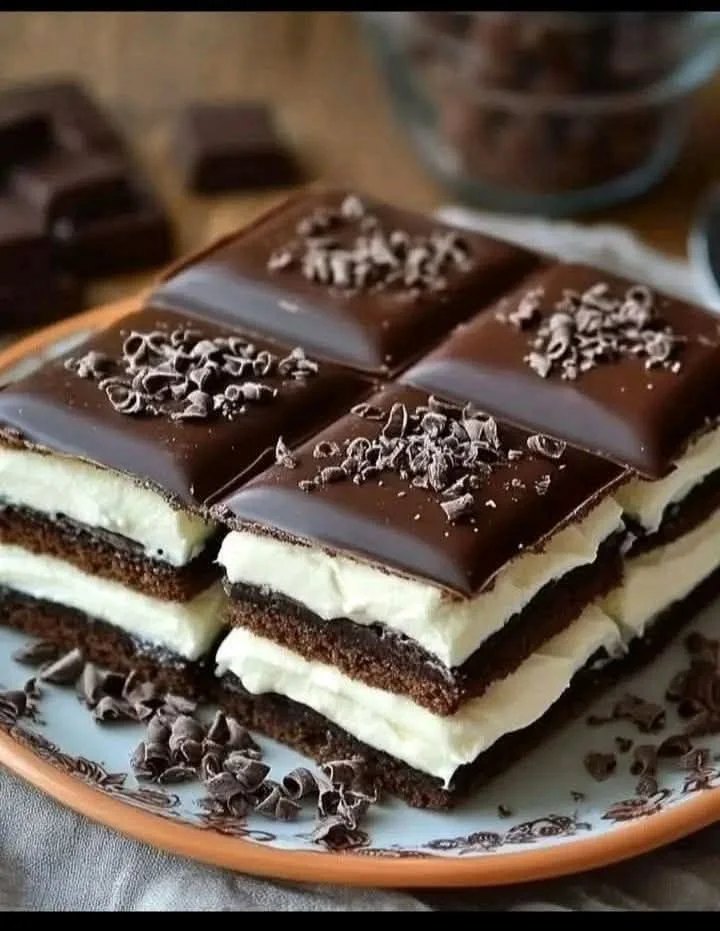
Delightful Chocolate Wafers with Cream: A Sweet Treat for Your Busy Days
Let’s be honest: chocolate has a magical way of making even the dullest days brighter. If you’re anything like me, a bite into a rich chocolate wafer with a smooth cream filling can instantly turn a mundane afternoon into a mini celebration. Chocolate Wafers with Cream are not just a treat; they’re a little piece of happiness wrapped in a crunchy shell that’s surprisingly easy to whip up, even on your busiest days.
So, whether you’re planning a cozy night in with the family or preparing for a gathering with friends (because who are we kidding—everyone loves chocolate!), this recipe is bound to become a favorite. Grab your apron, and let’s dive into the world of sweet indulgence!
Why You’ll Love This Chocolate Wafers with Cream
Picture this: You’ve just wrapped up a hectic day, and all you want is a moment of bliss. How about sinking your teeth into a crispy chocolate wafer filled with delightful cream? These treats are not only delicious, but they’re also incredibly easy to make, giving you more time to enjoy them (preferably with a cup of coffee or a cozy blanket). Plus, the kids will adore them! Just keep them a secret from your husband for a little while—let’s avoid any chocolate-related sibling rivalries.
Ingredients for Chocolate Wafers with Cream
Let’s chat about what you’ll need for this delectable recipe. Here’s the shopping list that’ll have you on your way to chocolate heaven:
-
For the Wafers:
- 1 cup all-purpose flour
- 1/2 cup unsweetened cocoa powder
- 1/2 teaspoon baking soda
- 1/4 teaspoon salt
- 1/2 cup unsalted butter, softened
- 1 cup granulated sugar
- 1 large egg
- 1 teaspoon vanilla extract
-
For the Cream Filling:
- 1/4 cup unsalted butter, softened
- 1 cup powdered sugar
- 2 tablespoons heavy cream (or milk, if you’re feeling like a rebel)
- 1/2 teaspoon vanilla extract
Steps to Create Your Chocolate Wafers with Cream
-
Preheat Your Oven: Start by preheating your oven to 350°F (175°C). Meanwhile, let’s get those arms ready for some mixing goodness.
-
Mix Dry Ingredients: In a medium bowl, whisk together the flour, cocoa powder, baking soda, and salt. Just imagine a cocoa cloud of sudden inspiration—breathe it in.
-
Cream the Butter and Sugar: In a large bowl, use an electric mixer to cream the softened butter and granulated sugar until light and fluffy (about 2-3 minutes). Just remember, if your kids are “helping” you in the kitchen, keep the mixer away from their tiny fingers—safety first!
-
Add the Egg and Vanilla: Beat in the egg and vanilla extract until the mixture is combined. This is where the magic starts to happen!
-
Combine: Gradually add the dry ingredients to the creamed butter mixture, mixing until well-combined. You can totally lick the bowl afterward—no judgment here!
-
Shape and Bake: Roll the dough into small balls and place them on a lined baking sheet, then press them flat with a fork. Bake for 10-12 minutes, until slightly firm. They might look like little chocolate frisbees, but trust me, they’re going to taste out of this world!
-
Cool: Once baked, allow them to cool completely on a wire rack.
-
Prepare the Cream Filling: In a separate bowl, beat the softened butter, powdered sugar, heavy cream, and vanilla extract until smooth and creamy. You want it to be spreadable but not too runny—think of a cloud that’s ready to swoosh onto a chocolate delight!
-
Assemble: Once the wafers are cool, spread a generous amount of cream filling on one wafer and top with another. Repeat until all are filled. Go ahead, stack them high like a mini chocolate tower!
Cooking Tips for Perfect Chocolate Wafers with Cream
- Feel free to experiment: Add a pinch of sea salt to the cream for a delightful sweet and salty combo!
- Don’t fret over the shape: If your wafers don’t turn out perfectly round, just call them artisanal. Who doesn’t love a little bit of rustic charm?
- Store leftovers… if there are any: Keep them in an airtight container at room temperature for up to a week. Though I doubt they’ll last that long—they’re just that good!
FAQs About Chocolate Wafers with Cream
Can I substitute unsweetened cocoa powder?
Absolutely! You can use Dutch-processed cocoa powder if you have it on hand for a slightly different flavor.
How can I store leftovers?
These chocolate wafers can be stored in an airtight container for about a week, though I doubt they’ll stick around for that long—my kids usually devour them within days!
Indulge in Your Creation
And there you have it! Homemade Chocolate Wafers with Cream will not only satisfy your sweet tooth but also bring a smile to your face. They’re perfect for sharing, but let’s be real—sometimes you just need to treat yourself. Keep this recipe handy for those busy days or whenever you need a little pick-me-up. Trust me, your future self will thank you!
So, whether you’re hosting a gathering or having a quiet night in, these wafers are the chocolatey hug you didn’t know you needed. Give them a try, and watch the smiles bloom!
Meta Description:
Chocolate Wafers with Cream is the perfect recipe for busy days. Quick, easy, and delicious, this treat will become your go-to dessert. Try it today!
Chocolate Wafers with Cream
Ingredients
Method
- Preheat your oven to 350°F (175°C).
- In a medium bowl, whisk together the flour, cocoa powder, baking soda, and salt.
- In a large bowl, use an electric mixer to cream the softened butter and granulated sugar until light and fluffy (about 2-3 minutes).
- Beat in the egg and vanilla extract until combined.
- Gradually add the dry ingredients to the wet mixture, mixing until well-combined.
- Roll the dough into small balls and place them on a lined baking sheet, then press them flat with a fork.
- Bake for 10-12 minutes, until slightly firm.
- Allow them to cool completely on a wire rack.
- In a separate bowl, beat the softened butter, powdered sugar, heavy cream, and vanilla extract until smooth and creamy.
- Spread a generous amount of cream filling on one wafer and top with another. Repeat until all are filled.
- Stack them high for a mini chocolate tower!