
Jump to RecipeHomemade Cheese: A Simple Craft for Cheese Lovers
Whipping up homemade cheese is more than just a recipe—it’s a delightful way to tap into your inner culinary genius right from your own kitchen! If you’ve ever found yourself standing in front of the fridge, lamenting the lack of good cheese for your late-night snack, then this homemade cheese adventure is just what you need. Whether it’s for a cozy family gathering or simply indulging in a well-deserved treat, nothing beats the satisfaction of creating something delicious with your own two hands.
Why You’ll Love This Homemade Cheese
Let’s be honest; who doesn’t love cheese? It can elevate any dish from ordinary to extraordinary in a heartbeat! This homemade cheese recipe is not only simple but also a fantastic way to impress your friends and family. Plus, you can customize it according to your taste. Want to throw in some herbs or spices? Go for it! This recipe is perfect for busy women looking to add a pinch of creativity to their culinary repertoire without spending hours in the kitchen.
Ingredients for Homemade Cheese
Before we get started, let’s gather our ingredients. Don’t worry; it’s refreshingly simple:
- 1 gallon of whole milk (the fresher, the better!)
- 1/4 cup of white vinegar (yes, your kitchen is supposed to smell a bit tangy!)
- Salt to taste (you can tweak this based on your cheesemaking ambitions)
- Optional: Fresh herbs, garlic, or spices for added flair (because who said cheese can’t be fun?)
Step-by-Step Directions to Your Cheese Heaven
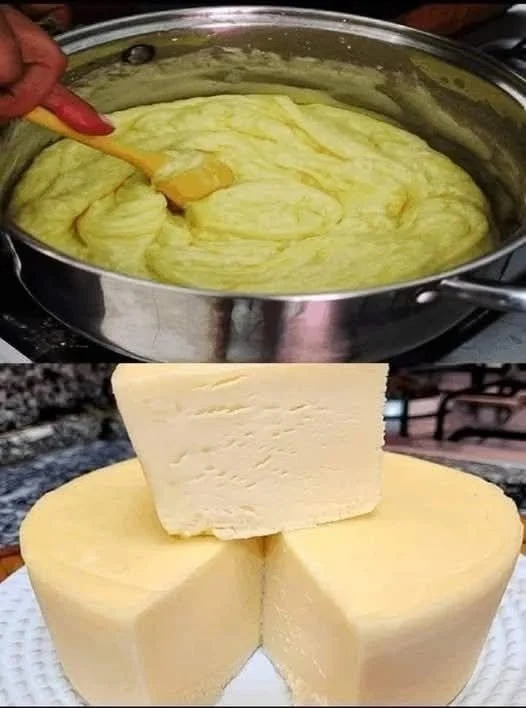
- Heat the Milk: Pour the gallon of milk into a large pot and slowly heat it over medium heat. Stir occasionally to prevent the milk from scorching. Aim for a temperature around 190°F—like a nice warm bath for your milk.
- Add the Vinegar: Once you reach this lovely temperature, add the vinegar while gently stirring the milk. You’ll see curds forming almost immediately. Magic, right? If it’s not curdling, don’t panic; just add a touch more vinegar.
- Let it Sit: Remove the pot from the heat and let it sit for about 10 minutes. This is the moment when your kitchen starts smelling like a cheese lover’s paradise.
- Strain the Curds: Line a colander with cheesecloth (or a clean dish towel, in a pinch) and carefully pour the curds and whey into it. Rinse the curds under cold water to eliminate the tangy vinegar taste. Gather the cheesecloth and twist to squeeze out any excess whey.
- Season and Enjoy: Transfer the curds to a bowl, add salt to taste, and mix well. Here’s where you can throw in any herbs or spices to jazz it up even more. Give it a little taste test; adjust the flavor if necessary.
- Chill and Serve: Transfer your fresh cheese into a container and refrigerate for at least an hour to firm up. Then, serve it up with crackers, fresh veggies, or add it to your favorite dishes. It’s like bringing the cheese shop experience right to your home!
Cooking Tips for Success
- Temperature is Key: Make sure your milk is properly heated before adding the vinegar; otherwise, the curds might not form as nicely. Think of it like a warm hug that the milk really enjoys!
- Don’t Rush the Cooling: Letting your cheese cool and set properly helps enhance the texture. Good things come to those who wait, right?
- Experiment with Flavors: Have fun! If you’re feeling adventurous, try adding roasted garlic or different herbs into the mix. The sky’s the limit!
A Personal Note on Homemade Cheese
I remember the first time my sister Patricia and I made homemade cheese in our kitchen—what a disaster! We didn’t quite know what we were doing, and our cheese ended up looking like a science experiment gone wrong. But with a little patience and practice, it became a frequent showcase at our family gatherings. There’s nothing quite like sharing a platter of warm, homemade cheese and watching everyone’s eyes light up!
FAQs About Homemade Cheese
- Can I substitute the vinegar? Absolutely! Lemon juice works wonderfully in place of vinegar for a slightly different flavor profile.
- How long can I store my homemade cheese? When stored in an airtight container, it can last up to a week in the fridge. But trust me, it probably won’t last that long!
- What can I do with leftover whey? Don’t toss it! Use it in baking, smoothies, or even soup for added nutrition and flavor.
Wrap-Up the Cheese Adventure
In just a few simple steps, you’ve transformed a gallon of milk into a delicious homemade cheese that will have everyone singing your praises! This homemade cheese recipe opens up a world of culinary creativity and fun that anyone can master. So gather your ingredients, grab your sister or a friend, and dive into the delightful world of cheese-making together. And remember, it’s not just about the cheese; it’s about the laughter and memories you create along the way!
For more delightful recipes that will make your meals shine, check out my simple family meals or indulge in decadent desserts. Happy cooking, cheese lovers!
Meta Description: Homemade cheese is a must-try for any cheese lover! Quick, easy, and delicious, this recipe will become your go-to gourmet treat at home.

Homemade Cheese
Ingredients
Method
- Pour the gallon of milk into a large pot and slowly heat it over medium heat. Stir occasionally to prevent the milk from scorching, aiming for around 190°F.
- Once the desired temperature is reached, add the vinegar while gently stirring the milk. Curds should form almost immediately.
- Remove the pot from heat and let it sit for about 10 minutes.
- Line a colander with cheesecloth and pour the curds and whey into it. Rinse the curds under cold water to eliminate the vinegar taste.
- Squeeze out any excess whey by twisting the cheesecloth.
- Transfer the curds to a bowl, add salt to taste, and mix well. You can also add any optional herbs or spices at this point.
- Transfer the cheese into a container and refrigerate for at least an hour to firm up before serving.