
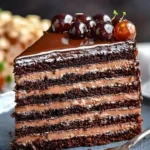
The Ultimate 24 Layer Chocolate Cake: A Chocolate Lover’s Dream
Are you ready to embark on a delicious journey through layers of rich chocolate? The 24 Layer Chocolate Cake is not just a dessert; it’s an experience—a towering testament to your baking prowess and a showstopper at any gathering. Whether you’re hosting a birthday bash or simply craving a sweet indulgence, this cake will surely bring smiles and perhaps a bit of awe from your loved ones. Let’s dive into this wonderfully decadent recipe that promises to elevate your dessert game!
Why You’ll Love This 24 Layer Chocolate Cake
Imagine slicing through 24 delicate layers of moist, chocolatey goodness, revealing a hidden treasure of creamy frosting between each slice. It’s like a chocolate dream come true! This cake is perfect for impressing guests or just enjoying on a cozy Sunday afternoon. Plus, it’s the perfect excuse to pull out your fanciest cake stand and show off those baking skills you’ve been honing during quarantine. It’s not just about the cake; it’s about the joy of baking and the laughter that follows!
Ingredients: Gathering Your Sweet Arsenal
Before we get our hands chocolaty, let’s gather the ingredients that will help us create this masterpiece:
For the Cake:
- 2 1/2 cups all-purpose flour
- 1 3/4 cups granulated sugar
- 2/3 cup unsweetened cocoa powder (the star of the show!)
- 2 1/2 teaspoons baking powder
- 1 1/2 teaspoons baking soda
- 1 teaspoon salt
- 3 large eggs
- 1 cup whole milk
- 1/2 cup vegetable oil
- 2 teaspoons pure vanilla extract
- 1 cup boiling water
For the Frosting:
- 1 cup unsalted butter, softened
- 4 cups powdered sugar
- 1/2 cup unsweetened cocoa powder
- 1/4 cup heavy cream
- 2 teaspoons pure vanilla extract
Steps to Chocolate Heaven
Now that we have our ingredients ready, let’s bake this fabulous chocolate delight step by step!
1. Prepping the Cake:
- Preheat your oven to 350°F (175°C). Grease and flour your cake pans (you can use six 9-inch pans for easier layering).
- In a large bowl, whisk together the flour, sugar, cocoa powder, baking powder, baking soda, and salt until well combined.
2. Mixing It Up:
- Add the eggs, milk, vegetable oil, and vanilla extract to the dry ingredients while mixing on medium speed until smooth.
- Carefully stir in the boiling water. This step is crucial as it creates a batter that is thinner but will yield a super moist cake.
3. Baking the Layers:
- Pour an even amount of batter into each prepared pan. Bake in the preheated oven for about 30-35 minutes, or until a toothpick inserted in the center comes out clean.
- Allow the cakes to cool in the pans for about 10 minutes before transferring them to wire racks to cool completely.
4. Whipping Up the Frosting:
- In a medium bowl, beat the softened butter until creamy. Gradually add the powdered sugar and cocoa powder, mixing well.
- Slowly add the heavy cream and vanilla extract until you reach the desired consistency. It should be thick but spreadable—like the kind of frosting that dreams are made of!
5. Stack It Up:
- Once the cakes are completely cool, it’s time to assemble! Start with the first layer, spread a generous amount of frosting on top, and then place the next layer on top. Repeat this process until all layers are stacked, ending with a final frosting layer on the top and sides of the cake.
6. The Grand Finale:
- If you’re feeling adventurous, top your cake with chocolate shavings or fresh berries for that extra touch. You’ve just created a dessert that could charm even the grumpiest of taste buds!
Cooking Tips for Success
- Level Up: If your cakes have domed tops, you might want to level them with a serrated knife to make stacking easier. Don’t worry, use those scraps for taste-testing—it’s a baker’s privilege!
- Chill Out: Refrigerate the assembled cake for about an hour to allow the frosting to set before serving. This also makes slicing much cleaner—no one likes a squished layer!
- Save Some for Later: This cake freezes beautifully! Just wrap it tightly in plastic wrap and store it in an airtight container. When the chocolate cravings hit later, you’ll be ready!
FAQs About Your 24 Layer Chocolate Cake
Can I substitute any ingredients?
Absolutely! You can swap out the all-purpose flour for a gluten-free blend or use almond milk instead of whole milk if you’re looking for dairy-free options.
How can I store leftovers?
Keep your cake in an airtight container in the refrigerator for up to a week—or keep it in the freezer for even longer. Just make sure it’s well-wrapped to avoid freezer burn!
Will this cake really turn out with 24 layers?
Yes, it can! But if this sounds a bit daunting, you can always start with fewer layers. With practice, 24 layers won’t seem so daunting, and the smiles you’ll get will definitely be worth the effort.
It’s time to show the world what you’ve got, and nothing says “I love you” (or “Look at me, I’m an amazing baker!”) quite like the 24 Layer Chocolate Cake. Cue the applause! So grab your apron, channel your inner chocolate goddess, and let’s make some delicious memories. Happy baking—you’ve got this!
Want more delectable recipes? Check out my Chocolate Chip Cookies or my secret family recipe for Classic Carrot Cake. Each recipe brings a sprinkle of joy just like this one!
Meta Description: 24 Layer Chocolate Cake is the perfect treat for chocoholics. Quick, easy, and delicious, this show-stopper will impress everyone!
24 Layer Chocolate Cake
Ingredients
Method
- Preheat your oven to 350°F (175°C). Grease and flour your cake pans (you can use six 9-inch pans for easier layering).
- In a large bowl, whisk together the flour, sugar, cocoa powder, baking powder, baking soda, and salt until well combined.
- Add the eggs, milk, vegetable oil, and vanilla extract to the dry ingredients while mixing on medium speed until smooth.
- Carefully stir in the boiling water. This step is crucial as it creates a batter that is thinner but will yield a super moist cake.
- Pour an even amount of batter into each prepared pan. Bake in the preheated oven for about 30-35 minutes, or until a toothpick inserted in the center comes out clean.
- Allow the cakes to cool in the pans for about 10 minutes before transferring them to wire racks to cool completely.
- In a medium bowl, beat the softened butter until creamy. Gradually add the powdered sugar and cocoa powder, mixing well.
- Slowly add the heavy cream and vanilla extract until you reach the desired consistency. It should be thick but spreadable.
- Once the cakes are completely cool, it’s time to assemble! Start with the first layer, spread a generous amount of frosting on top, and then place the next layer on top.
- Repeat this process until all layers are stacked, ending with a final frosting layer on the top and sides of the cake.
- If you’re feeling adventurous, top your cake with chocolate shavings or fresh berries for that extra touch.
- You’ve just created a dessert that could charm even the grumpiest of taste buds!