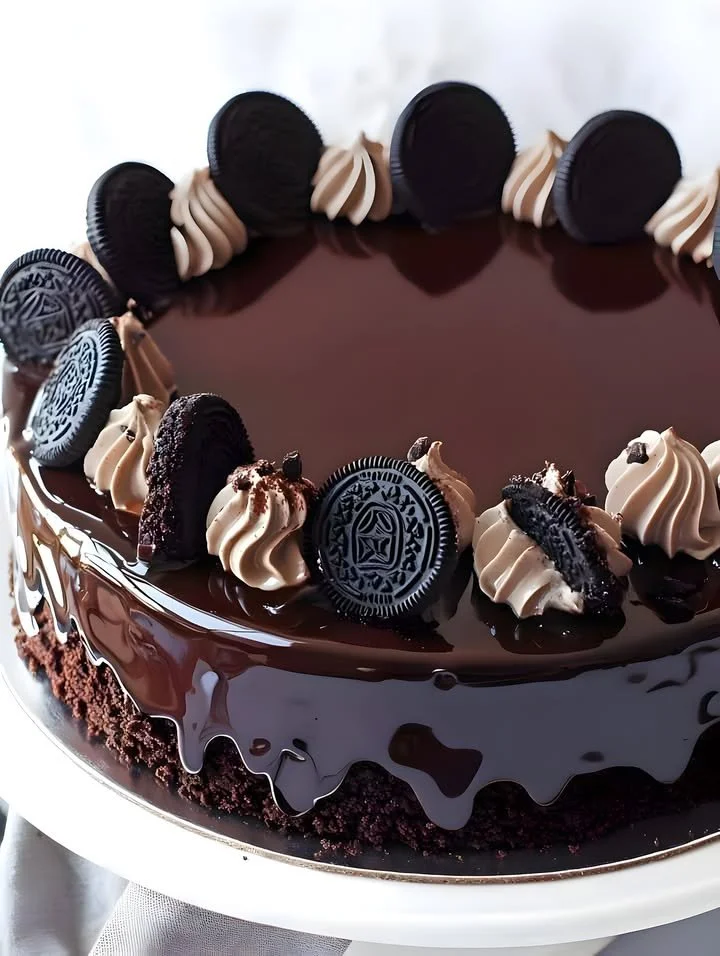
Elevate Your Dessert Game with Dark Chocolate Mirror Glaze
Are you ready to impress your friends and family with a show-stopping dessert? Well, hold onto your whisk because the Dark Chocolate Mirror Glaze is here to steal the spotlight! This luscious glaze is more than just a pretty face; it’s the kind of finishing touch that transforms your homemade cakes into gourmet masterpieces. Whether you’re hosting a birthday bash or just treating yourself after a long weekday grind, this recipe will have everyone at the table going “Oooh!” and “Aaah!”…
Why You’ll Love This Dark Chocolate Mirror Glaze
The beauty of this dark chocolate mirror glaze lies not only in its glossy finish but also in its rich, chocolatey flavor that pairs perfectly with almost any cake. Let’s be real; who doesn’t love chocolate? This glaze is quick to make, using a handful of ingredients that you likely already have in your pantry. Plus, it’s such an easy way to elevate your baking game without needing a formal culinary education (don’t worry, I won’t tell anyone!).
So, grab your apron and let’s dive into this simple yet delightful recipe that will indeed impress your loved ones and even leave them wondering if you took a secret trip to a fancy bakery!
Ingredients You’ll Need
Before we roll up our sleeves, let’s gather our ingredients. Here’s what you’ll need for that glorious mirror glaze:
- 1 cup water
- 2 cups granulated sugar
- 1 cup unsweetened cocoa powder
- 1/2 cup heavy cream
- 1 1/2 teaspoons gelatin powder (ensure it’s unflavored)
- 1/2 cup dark chocolate (approximately 60-70% cocoa), chopped
Let’s Make That Glaze!
Now that we have everything, let’s get cooking! Here’s how to whip up your dark chocolate mirror glaze:
Step 1: Mix It Up
Start by simmering the water, sugar, and cocoa powder in a medium saucepan over medium heat. Stir continuously until the sugar has completely dissolved. This magical moment will make your kitchen smell like a chocolate factory — and who doesn’t want that?
Step 2: Gelatin Time
In a small bowl, hydrate your gelatin with a few tablespoons of cold water for about 5 minutes. Once it’s bloomed and looks a bit sad, stir it into the warm chocolate mixture. It’s like adding a little magic potion!
Step 3: Creamy Goodness
Add the heavy cream to your pan and mix until combined. Then, bring the mixture back to a gentle simmer, but please don’t boil it. We don’t want to break the glossy spell we’re casting here!
Step 4: Add Dark Chocolate
Once the mixture is hot (not boiling!), remove it from heat and add your chopped dark chocolate. Give it a good stir until it’s all melted and velvety smooth. This is where the chocolate stages its grand entrance, reminiscent of a rom-com reveal.
Step 5: Cool It Down
Allow your glaze to cool to room temperature before using it. Patience, my friend — it’ll pay off in shiny rewards!
Step 6: Pour & Enjoy
Now it’s time for the moment of truth! Pour the glaze over a chilled cake or dessert of your choice. Let it drip and cascade down the sides like a glamorous waterfall. Voilà! Your creation is now ready for Instagram. Don’t forget to tag us; we love to see your masterpieces!
Cooking Tips for Perfect Glaze
- Have a thermometer handy! The ideal pouring temperature for your glaze should be around 90°F. A quick check can save your glaze from an unwanted pool of chocolate.
- Chill your cake beforehand; a cold surface helps the glaze set more effectively.
- If your glaze seems too thick upon cooling, simply reheat it gently while stirring — it’s all part of the baking journey!
Personal Anecdote
I remember the first time I made this dark chocolate mirror glaze for my sister’s birthday. Let’s just say it was her “wow” moment as she took that first bite. You could even hear her savoring it from across the room! Since then, it’s become my go-to recipe for special occasions, and I simply can’t help but channel my inner chocolatier every time I prepare it.
FAQs About Dark Chocolate Mirror Glaze
Can I substitute the dark chocolate in this recipe?
Absolutely! If you prefer milk chocolate, just keep in mind that it will produce a sweeter glaze, which could delight some and leave others reaching for the espresso!
How can I store leftovers?
Store any leftover glaze in an airtight container in the fridge for up to a week. Just remember, when you’re ready to use it again, gently reheat it to reestablish that glorious shine.
Can I use this glaze on other desserts?
Yes, yes, and more yes! This heavenly glaze works well over tarts, cupcakes, or even as a decadent dip for fruits. The sky’s the limit!
As a passionate cook, I can assure you that this dark chocolate mirror glaze will not only add a touch of elegance to your dessert but will also wrap you in warm memories and make you feel like the most celebrated chef in your kitchen. So go ahead, indulge yourself in this chocolate delight and let it lead you to sweet success. Happy baking!
Meta Description
Dark Chocolate Mirror Glaze is the perfect recipe for impressing loved ones. Quick, easy, and delicious, this glossy treat will elevate any dessert!
Dark Chocolate Mirror Glaze
Ingredients
Method
- Simmer the water, sugar, and cocoa powder in a medium saucepan over medium heat, stirring continuously until the sugar dissolves.
- In a small bowl, hydrate the gelatin with a few tablespoons of cold water for about 5 minutes. Stir it into the warm chocolate mixture.
- Add the heavy cream to the pan and mix until combined. Bring the mixture back to a gentle simmer without boiling.
- Remove from heat and add the chopped dark chocolate, stirring until melted and smooth.
- Allow the glaze to cool to room temperature before using.
- Pour the glaze over a chilled cake or dessert of your choice and let it cascade down the sides.